Introduction
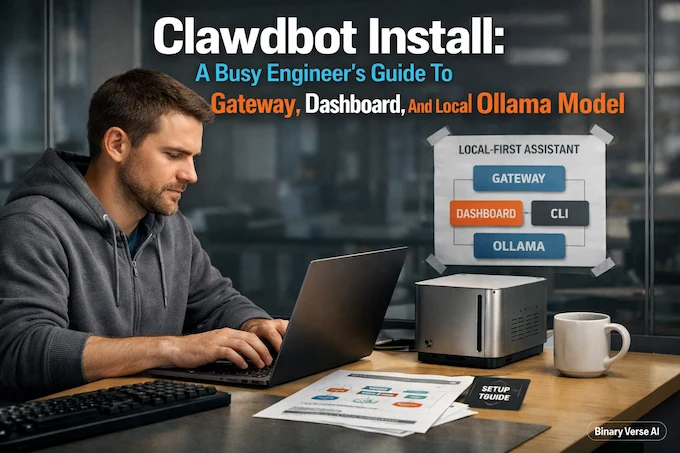
If you’ve ever wanted a “personal assistant” that lives on your machine instead of in a stranger’s cloud, you’re in the right place. The pitch is simple: run a tiny control plane (the Gateway), talk to it through a dashboard, and point it at a local LLM so your prompts do not leave your box unless you want them to.
This post is the guide I wish existed the first time I did a Clawdbot Install. It’s opinionated, it respects your time, and it assumes you’d rather ship than cosplay as a DevOps team.
Table of Contents
1. Clawdbot Install: What You’re Building (And Why It’s Worth It)
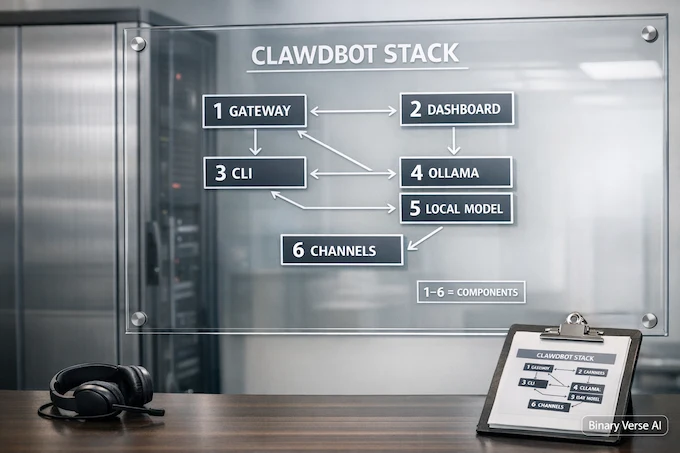
Clawdbot is best understood as plumbing. The sexy part is the assistant, but the part that makes it feel “always on” is the Gateway. Think of the Gateway as a single WebSocket control plane that coordinates sessions, channels, tools, and the Control UI dashboard. Your local model, via Ollama, becomes just another provider the Gateway can route to.
Here’s what you’ll end up with after this Clawdbot Install:
Clawdbot Install: Core Pieces and Responsibilities
| Piece | Runs Where | What It Does | You Care Because |
|---|---|---|---|
| Gateway | Your machine or VPS | Always-on control plane, serves the dashboard | Keeps state, routes messages, stays alive |
| Dashboard (Control UI) | Your browser | Web UI on port 18789 | Quick visibility, pairing, status, logs |
| CLI | Your terminal | Commands like onboard, health, agent | Fast debugging, automation, upgrades |
| Local model (Ollama) | Your machine or GPU box | Hosts models like GLM | Privacy, cost control, predictable latency |
A quick reality check: you can run this on a home PC, a cheap VPS, or an old laptop. The difference is mostly tradeoffs, not capability. The rest of this guide is about making the tradeoffs explicit so you do not fall into the usual traps.
1.1 Who This Guide Is For
- You want a straightforward Clawdbot Install on Ubuntu or any sane Linux.
- You are okay with a terminal, but you do not want to spend an afternoon guessing which port is blocked.
- You want local models, specifically clawdbot ollama, because the whole point is “my machine, my rules.”
2. Prerequisites Checklist (Avoid 80% Of Failures)
Most “it doesn’t work” reports are not mysterious bugs. They are predictable mismatches: wrong Node version, a port conflict, or a service that never actually started.
Before your Clawdbot Install, check these. A careful Clawdbot Install is mostly about removing boring uncertainty:
2.1 Runtime And Tools
- Node 22+. Not “close enough,” not “it worked on Node 18 for my other project.” This stack moves fast, and Node 22 keeps you out of the ditch.
- curl and a basic shell. If you can run curl –version, you are fine.
- A browser that can reach 127.0.0.1.
2.2 Ports And Process Sanity
- The dashboard lives on port 18789 by default.
- Make sure nothing else is squatting there: ss -ltnp | grep 18789 or lsof -i :18789.
- If you are on a VPS, remember that “I can curl localhost” and “I can reach it from my laptop” are different problems.
2.3 Quick “Am I Ready?” Commands
Run these once and save yourself drama later:
node -v
npm -v
curl -fsSL https://example.com >/dev/null || true
If node -v does not show v22 or newer, fix that now. A clean Clawdbot Install starts with a boring, correct runtime.
3. Clawdbot Install: Two Official Paths (Pick One, Commit To It)
You’ve got two reasonable ways to do a Clawdbot Install. The mistake is mixing them halfway through, then wondering why your binaries do not line up.
3.1 Option A: Installer Script (Fastest, Least Thinking)
curl -fsSL https://clawd.bot/install.sh | bashThis is the “get me to a working CLI today” route. If you’re on a fresh Ubuntu VM, it’s hard to beat.
3.2 Option B: Global npm Install (More Transparent)
npm install -g clawdbot@latestThis path is nice if you want npm to own the lifecycle. It’s also easier to reason about when you debug, because you know exactly how the CLI landed on your machine.
Either way, once the CLI is in place, the next step is identical. And it’s the step people skip, because it looks optional. It isn’t.
4. Run Onboarding The “Right” Way (The Wizard Is The Setup)
The onboarding wizard is not fluff. It writes the config, installs the user service, and sets you up so the Gateway survives reboots. In other words, it turns a toy into an appliance.
Run:
clawdbot onboard --install-daemonThis single command is the heart of a stable Clawdbot Install. It creates the boilerplate config under your home directory, and it wires the Gateway into systemd as a user service so you are not babysitting a terminal tab forever.
4.1 What The Wizard Actually Does
- Writes your main config file, usually at ~/.clawdbot/clawdbot.json
- Installs a background service that keeps the Gateway running
- Sets up defaults for sessions and the Control UI
If you like mental models, think of onboarding as “provision the control plane.” Everything else is configuration and verification.
5. Start The Gateway And Open The Dashboard (What “Healthy” Looks Like)
After onboarding, you want two things: the Gateway running, and the dashboard reachable.
5.1 Verify The Service
clawdbot gateway status
clawdbot status
clawdbot health
What you’re looking for is boring output. “Running,” “healthy,” and no angry stack traces. If you see nothing, or your command hangs, treat it as a service problem first, not an AI problem.
5.2 Open The Dashboard
In your browser:
If you’re doing this on a remote box, do not open the port to the world out of impatience. Use an SSH tunnel or a tailnet. You can expose it later, once it works locally.
At this point, most installs are basically done. The remaining work is integrating a model provider and not getting tripped up by auth tokens.
6. Fix: Clawdbot Dashboard 1008 Unauthorized (And Stop Losing Your Weekend)
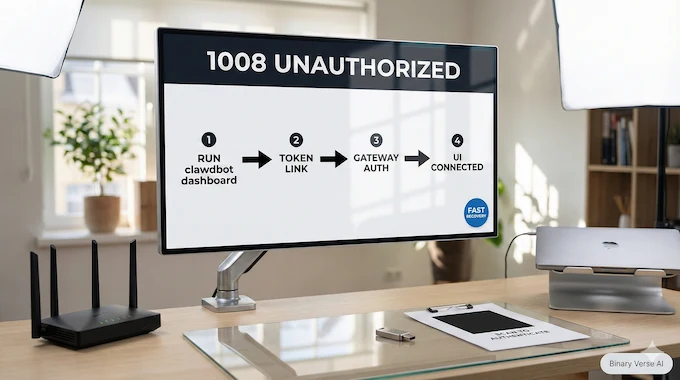
Let’s talk about the failure mode you will see in screenshots all over the internet, the one people literally search as “clawdbot dashboard 1008 unauthorized”: the dashboard says “disconnected,” or you get hit with 1008.
This is not a moral judgment. It’s a token mismatch, a version mismatch, or you opened the dashboard URL without the right auth context.
6.1 The Fast Recovery Flow
Run:
clawdbot dashboardThis command gives you a tokenized link and often fixes the problem immediately. If your Clawdbot Install is otherwise healthy, this is the shortest path back to a functional UI.
6.2 Why It Happens
- The dashboard is a WebSocket client, and the Gateway expects a valid auth token.
- If you upgraded one component and not the other, you can end up in a mismatch state.
- If you copied a URL from an old session, the token can be stale.
Treat 1008 as a “sync the UI with the Gateway” issue, not a “reinstall everything” issue.
7. Install Ollama And Pull A Local Model (GLM Works Great)
Now for the fun part: clawdbot ollama. Ollama gives you a local model server with a simple CLI. Clawdbot can then treat your local model like a provider, so the assistant answers without leaving your network.
7.1 Install Ollama
Follow Ollama’s install steps for Linux. Once it’s installed, confirm it runs:
ollama listIf that prints a list, even an empty one, you’re good.
7.2 Pull GLM 4.7 Flash
ollama pull glm-4.7-flash
ollama list
You should see the model in the list. If you do not, check disk space and your network. Pulling models is the one part of this tutorial that can be slow, and it is also the part that fails silently when your drive is full.
8. Enable Ollama In Clawdbot (The Opt-In That Confuses Everyone)
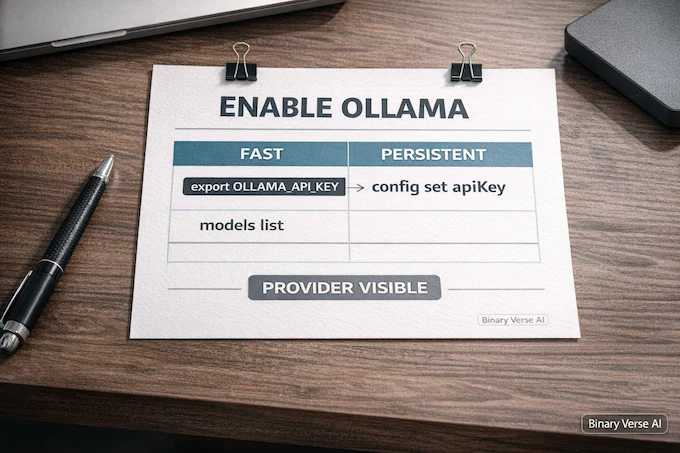
Here’s the odd bit: Clawdbot does not always auto-discover Ollama models unless you opt in by setting an “API key.” Ollama does not need a real key, but Clawdbot wants a non-empty value to enable the provider.
This is the source of the infamous clawdbot local model api key confusion. The fix is simple, but it’s easy to miss.
8.1 Fastest Way: Environment Variable
export OLLAMA_API_KEY="ollama-local"8.2 Persistent Way: Write It Into Config
clawdbot config set models.providers.ollama.apiKey "ollama-local"Now Clawdbot can discover local models and list them:
clawdbot models listIf you’re keeping score, this is the step that upgrades your Clawdbot Install from “gateway is alive” to “gateway can actually answer without cloud credentials.”
9. Make It Ollama-First (Set GLM As The Default Model)
You can have multiple providers configured, but most people want the local model to be the default. Otherwise you end up accidentally hitting a paid API and wondering where your credits went.
Open ~/.clawdbot/clawdbot.json and set your default model:
{
  "agents": {
    "defaults": {
      "model": { "primary": "ollama/glm-4.7-flash" }
    }
  }
}
Then restart the Gateway so the change actually takes effect:
clawdbot gateway restart
clawdbot status
This is the “it feels local” moment of a Clawdbot Install. Your assistant is now wired to your machine’s model server by default.
10. Quick End-To-End Test (CLI) And What To Do If You Get No Reply
Time to send a simple message through the Gateway and make sure you get a reply back.
clawdbot agent --agent main --message "Hello, introduce yourself in one sentence."
If you get a response, congrats. You have a working Clawdbot Install with a local model.
If you get nothing, here’s the shortest debugging path.
10.1 The Three Checks That Catch Most Issues
- Gateway health
clawdbot healthshould not be angry. - Ollama is reachable
ollama listshould work, andclawdbot models listshould show your model. - Default model ID is correct
The model string must match the provider format, for exampleollama/glm-4.7-flash.
10.2 The “It’s Running But Not Answering” Pattern
This is usually one of:
- The local model is too heavy for your hardware and is thrashing.
- You pulled a model name that differs from what Clawdbot expects.
- You forgot to restart the Gateway after editing config.
The fix is rarely “wipe everything.” It’s usually “make the provider visible, then restart.”
11. Connect WhatsApp, Telegram, Or Discord (Safely, Without Making It Public)
Once your local loop works, channels are the optional spice. They’re also where people accidentally turn their personal assistant into a public endpoint.
Run the login flow:
clawdbot channels login
For WhatsApp, you’ll scan a QR code in WhatsApp, under Settings, Linked Devices. For Telegram, you’ll configure a bot token. Discord and Slack require their respective app tokens.
The important part is the default security posture. Most setups start with pairing or allowlists, not “anyone on the internet can DM my bot.” That’s good. Keep it that way.
11.1 The Pairing Mental Model
- Unknown senders get a pairing code.
- You explicitly approve the code.
- Approved senders go into a local allowlist.
This is a nice trade. You get convenience without gifting strangers a shell on your machine.
12. Security, Cost Control, And Popular Setups (VPS, Docker, WSL)
People argue about where to run this as if there’s one correct answer. There isn’t. There’s only “what you’re optimizing for.”
12.1 Security And Cost Control You Should Actually Do
- Keep the Gateway bound to loopback unless you have a real reason.
- If you expose it, do it through a tailnet or SSH tunnel, not a raw open port.
- Prefer local models for routine tasks, and reserve paid models for when quality matters.
- Add rate limits and avoid letting the bot “autopilot” anything expensive.
A Clawdbot Install is powerful because it can touch real systems. That’s also why you treat inbound messages as untrusted input.
12.2 Popular Setups, And When Each Makes Sense
Clawdbot Install: Choose Your Setup
| Setup | Best For | What You Gain | What You Give Up |
|---|---|---|---|
| clawdbot setup vps | Always-on assistant, low cost | 24/7 uptime, easy remote access | Extra security hardening |
| clawdbot docker | Isolation, repeatability | Clean boundaries, easy resets | More moving parts, GPU pass-through work |
| clawdbot wsl | Windows users | Best path to “Linux-ish” on Windows | Some filesystem quirks |
| Home PC | Local-first privacy | Best latency, simplest debugging | Needs to stay on |
| Raspberry Pi | Fun, lightweight workloads | Cheap always-on box | Limited model options |
If you want the cleanest mental model, start with a normal Linux box and no channels. Get the local loop solid. Then add channels. Then consider isolation. That sequence prevents the “everything is broken” feeling.
12.3 Updating Without Breaking Your Setup
Here’s the boring truth: updating is where most DIY assistants die, not installation.
A good rhythm looks like this:
- Back up ~/.clawdbot/ before you change anything important.
- Update using the official update mechanism for your install path.
- After upgrades, run clawdbot doctor if available, and re-check clawdbot health.
Treat your config like code. Small diffs, one change at a time, and a quick rollback plan.
12.4 The Short Version (And Your Next Step)
If you only remember three things from this Clawdbot Install guide, make them these:
- Node 22+ is non-negotiable.
- The wizard is the setup. Run clawdbot onboard –install-daemon.
- Local models need an opt-in. Set OLLAMA_API_KEY so discovery works.
If you’ve got it running, do one more thing today: send yourself a real message through your preferred channel, and make sure the assistant replies exactly once, from the right model, with no surprise costs.
When you’re ready, take your Clawdbot Install from “it works” to “it’s useful.” If you only do one thing after your Clawdbot Install, make it this: pick one real chore, like triaging your inbox or drafting a reply, wire it up, and let the boring parts of your week evaporate.
And if you hit a weird snag, start with the fundamentals. Re-run health checks, confirm the dashboard token, confirm Ollama discovery. Most “mysterious” failures are just one missing knob in an otherwise solid Clawdbot Install.
1) What is Clawdbot?
Clawdbot is a self-hosted personal AI assistant you run on your own machine or server. It includes a Gateway (always-on control plane), a web dashboard, and channel integrations (WhatsApp, Telegram, Discord, etc.) so you can talk to one assistant from the apps you already use.
2) How do I activate my bot after installing Clawdbot?
After your Clawdbot Install, run the onboarding wizard to create config and install the Gateway daemon, then approve pairing for your account. Typical flow: run clawdbot onboard --install-daemon, message your bot on your chosen channel, then approve the pairing code so only you can interact with it.
3) Is Clawdbot free?
The software is open-source, so the Clawdbot Install itself costs nothing. Costs depend on what you connect: hosted model providers can charge per token or subscription, and a VPS costs monthly. If you run fully local models through Ollama, your main “cost” is hardware and electricity.
4) How do I set up Clawdbot on a VPS and keep it running 24/7?
Do your Clawdbot Install on the VPS as a non-root user, then run clawdbot onboard --install-daemon to install the user-level service. Verify with clawdbot status and clawdbot health. For safe dashboard access, use an SSH tunnel to port 18789 instead of exposing it publicly.
5) Can I run Clawdbot fully locally with Ollama, and why does it still ask for an API key?
Yes, you can run Clawdbot fully locally with Ollama. The “API key” prompt usually means the provider is opt-in. Set OLLAMA_API_KEY to any non-empty string to enable discovery in Clawdbot. This matches the common OpenAI-compatible provider pattern where clients expect a key field even if the local endpoint doesn’t truly require one.